Difference between revisions of "Using ChibiStudio"
(→create the first demo project) |
(→Using the uGFX repository with symlinks) |
||
| (22 intermediate revisions by the same user not shown) | |||
| Line 83: | Line 83: | ||
[[File:chibi-IDE.png|300px]] | [[File:chibi-IDE.png|300px]] | ||
| − | === | + | === Create the first demo project === |
| − | Close the welcome screen (pressing the 'x' in the tab). ChibiStudio is shipped with two workspaces: One for ChibiOS/RT 3.x and one for ChibiOS/RT 2.x. | + | ==== Getting the files right ==== |
| + | Close the welcome screen (pressing the 'x' in the tab). ChibiStudio is shipped with two workspaces: One for ChibiOS/RT 3.x and one for ChibiOS/RT 2.x. We'll use ChibiOS/RT 2.x in this tutorial because 3.x wasn't quite ready when this guide was written. To switch to the ChibiOS/RT 2.x workspace, use ''File -> Switch Workspace -> c:\chibistudio\workspace26''. | ||
[[File:switchworkspace.png|300px]] | [[File:switchworkspace.png|300px]] | ||
| − | + | The easiest way to start a new project is by copying an example demo project. You can copy any of the demos that you'll find in the project explorer. In this tutorial we'll copy the demo project ''STM32F4xx-GPT''. A project needs to be opened before it can be copied. A double-click on the project will open it. Next, right-click on the folder icon of the project and select ''Copy''. Then, right-click on the same icon and select ''Paste''. A new window will appear giving you the ability to rename the project. Please note that the project name '''must not''' contain any spaces. | |
| − | + | The next step is to add the required uGFX files to create a working project. The following files need to be placed into the projects directory: | |
| + | * Display board file | ||
| + | * Touchscreen board file (if touchscreen is being used) | ||
| + | * Configuration file (gfxconf.h) | ||
| − | + | In this tutorial we're using the Mikromedia STM32-M4 board. This board is already supported by uGFX and therefore all the required files are linked internally. The only thing required to copy are the configuration files ChibiOS/RT. For this, copy all file from ''C:\ChibiStudio\ugfx\boards\base\Mikromedia-STM32-M4-ILI9341\example_chibios_2.x'' to your project directory. Replace any existing files. | |
| + | First we will try to run one of the built-in demos of uGFX. To do this you will need to delete the main.c as the built-in demo link a main.c file internally. | ||
| − | + | The following files and folder should be located inside of the project directory: | |
| + | * .build | ||
| + | * .cproject | ||
| + | * .project | ||
| + | * chconf.h | ||
| + | * halconf.h | ||
| + | * Makefile | ||
| + | * mcuconf.h | ||
| + | * openocd.cfg | ||
| − | + | ==== Modifying the Makefile ==== | |
| − | + | Next, we need to modify the Makefile slightly. We have to specify the path to both ChibiOS/RT and uGFX. We modify the both variables accordingly: | |
| − | + | <syntaxhighlight lang=make> | |
| − | + | GFXLIB = ../../ugfx | |
| − | + | CHIBIOS = ../../chibios | |
| − | + | </syntaxhighlight> | |
| − | + | ||
| − | + | ||
| + | We're already done. We can now build any of the available uGFX demos (those which can be found under ''/ugfx/demos/'') by specifying the demo path in the Makefile (settings the '''GFXDEMO''' variable): | ||
That the end. You can try to compile a demo. This will compile the gdisp basics demo as the line says : | That the end. You can try to compile a demo. This will compile the gdisp basics demo as the line says : | ||
| − | + | <syntaxhighlight lang=make> | |
| + | GFXDEMO = modules/gdisp/basics | ||
| + | </syntaxhighlight> | ||
| + | Note that certain demos (such as tetris) require to link the math library. Linking the math library is archived by adding '''-lm''' to the '''LDFLAGS''' variable: | ||
| + | <syntaxhighlight lang=make> | ||
| + | GFXDEMO = applications/tetris | ||
| + | LDFLAGS = -lm | ||
| + | </syntaxhighlight> | ||
| − | + | ==== Adding the uGFX source directory ==== | |
| − | + | The next step is to add the uGFX folder to the project. To do this, right-click on the project folder, select ''New -> Folder''. | |
| + | [[File:new-folder.png|500px]] | ||
| − | + | In the dialog, click the ''Advanced >>'' button, select ''Link to alternate location (Linked Folder)'' and select the uGFX directory. Then click ''Finish''. | |
| − | + | ||
| + | [[File:new-folder-link.png|500px]] | ||
| − | + | === Compiling === | |
| − | + | Compiling a project is done by clicking the hammer icon in the toolbar. | |
[[File:compile.png|80px]] | [[File:compile.png|80px]] | ||
| + | In case of you're getting any errors (the ''Problems'' tab in the bottom panel) you most likely haven't saved your files. If you hit any other problem please create a new thread in the [http://forum.ugfx.org uGFX community forum]. Please provide sufficient information and we will be happy to help you where we can. | ||
| − | + | [[File:compile-error.png|600px]] | |
| − | + | ||
| − | [[File:compile-error.png| | + | |
| − | + | Note that trying a different demo by changing the '''GFXDEMO''' variable in the Makefile requires cleaning the project first by clicking ''Project -> Clean''. | |
=== Final configuration of your project === | === Final configuration of your project === | ||
| + | Before you can download your compiled project to the board you need to do two more things: | ||
| + | * Change the board files (Only required for boards not supported by ChibiOS/RT) | ||
| + | * Configuring OpenOCD | ||
| + | ==== Changing the board files ==== | ||
| + | ChibiOS/RT requires board files. These board files set up the I/O pins of your microcontroller and do various other stuff. We need to tell ChibiStudio which board files need to be used. | ||
| − | + | To specify which ChibiOS/RT board files should be used right-click on the ''board'' directory in the project file tree and click on ''Properties''. | |
| − | + | ||
| − | + | ||
[[File:folder-change.png|200px]] | [[File:folder-change.png|200px]] | ||
| − | + | In the ''Resource'' tab click the ''Edit..'' button next to the ''Location'' label. | |
| − | + | ||
| − | + | ||
| − | + | ||
| − | + | ||
[[File:edit-properties.png|500px]] | [[File:edit-properties.png|500px]] | ||
| − | |||
| − | |||
| − | |||
| − | |||
| − | |||
| − | |||
| − | |||
| − | |||
| − | |||
| − | |||
| − | |||
| − | + | Select the path which contains the ChibiOS/RT board files. In this tutorial we're using the Mikromedia STM32-M4 board. This board is not supported by ChibiOS/RT. However, uGFX provides the required ChibiOS/RT board files. In our case the path is: ''C:\ChibiStudio\ugfx\boards\base\Mikromedia-STM32-M4-ILI9341'' | |
| − | + | === Configuring OpenOCD === | |
| + | Next we will create a configuration for OpenOCD. OpenOCD is the piece of software that talks to your programmer (ST-Link in your case). To configure OpenOCD, click ''External Tools configuration...''. | ||
[[File:openocd-config.png|300px]] | [[File:openocd-config.png|300px]] | ||
| − | Copy the ''OpenOCD on ST-Link V2 (prompts for .cfg target configuration)'' | + | Copy the ''OpenOCD on ST-Link V2-1 (prompts for .cfg target configuration)'' configuration. |
[[File:openocd-copy.png|300px]] | [[File:openocd-copy.png|300px]] | ||
| − | + | Change the name to something appropriate for your setup. In our case: ''OpenOCD for Mikromedia STM32''. Modify the argument option like: ''-c "telnet_port 4444" -f "interface/stlink-v2.cfg" -f "board/stm32f4discovery.cfg"''. If you're using a different hardware setup please modify the ''interface'' and ''board'' parameters accordingly. | |
| − | Change the name | + | |
[[File:Openocd-newconfig22.png|300px]] | [[File:Openocd-newconfig22.png|300px]] | ||
| + | Click ''Apply'' and ''Close''. | ||
| − | + | === Configuring debugger === | |
| + | The last thing left to do is configuring the debugger (GDB). To do this, click ''Debug configurations...'' | ||
| − | + | [[File:debug-window.png|300px]] | |
| + | Copy an existing debug profile that is appropriate for your platform. We pick the ''ARMCM4-STM32F407-DISCOVERY'' in our case. | ||
| − | [[File: | + | [[File:copy-debug.png|500px]] |
| + | Rename the project to ''MikroMedia-demo debug'' and change the project to MikroMedia-demo. | ||
| − | + | [[File:config-gdb-project.png|600px]] | |
| − | + | Click ''Apply'' and ''Close''. | |
| + | == Run the project == | ||
| + | Now it's time to actually compile and flash the project to the board. The follow steps are performed to run the code on the target: | ||
| + | # Compile | ||
| + | # Start OpenOCD | ||
| + | # Start Debugger | ||
| + | # Run | ||
| − | + | === Compile === | |
| + | Make sure that your project compiled without any errors. | ||
| + | === Start OpenOCD === | ||
| + | Start OpenOCD by clicking the little arrow next to the green icon with the red chest, pick the profile which you created earlier. If you're successful, you should be presented with various information of your target in the output panel at the bottom: | ||
| − | + | [[File:run-openocd.png|300px]] | |
| − | + | ||
| − | [[File: | + | |
| − | + | ||
| − | + | ||
| − | + | ||
| − | + | ||
| − | + | ||
| − | + | ||
| − | + | ||
| − | + | ||
| − | + | === Start Debugger === | |
| + | When you start the debugger the first time you will be presented with an error window telling you that ChibiStudio can't find the ''*.elf'' file. | ||
[[File:gdb-error.png|200px]] | [[File:gdb-error.png|200px]] | ||
| − | Open | + | Open the ''Debug configurations..'' window again. Edit the profile which you created earlier (''MikroMedia-demo debug'' in our case) and modify the ''C/C++ Application'' path so it points to the ''*.elf'' generated in your project directory ''.build'' location: ''C:\ChibiStudio\workspace26\MikroMedia-demo\.build\MikroMedia-demo.elf'': |
[[File:gdb-realconfig.png|600px]] | [[File:gdb-realconfig.png|600px]] | ||
| − | Click | + | Click ''Apply'' and ''Debug''. |
| − | + | ||
| − | + | ||
| + | If everything went smoothly the debugger should launch correctly and ChibiStudio should switch to the Debug perspective. | ||
[[File:debug-mode.png|600px]] | [[File:debug-mode.png|600px]] | ||
| − | + | === Run === | |
| − | + | When the binary could successfully be flashed to the microcontroller, GDB stops the program at the beginning of the ''main()'' function. To run your program, click the ''Resume'' button: | |
[[File:resume.png|80px]] | [[File:resume.png|80px]] | ||
| Line 230: | Line 240: | ||
=== Using the uGFX repository with symlinks === | === Using the uGFX repository with symlinks === | ||
In case of you're using the uGFX git repository instead of the stable release archive you might want to place the repository in a different location other than ''C:\ChibiStudio\ugfx''. However, you'd have to modify the path pointing to the uGFX root directory in the Makefile which might sometimes be inappropriate to do. | In case of you're using the uGFX git repository instead of the stable release archive you might want to place the repository in a different location other than ''C:\ChibiStudio\ugfx''. However, you'd have to modify the path pointing to the uGFX root directory in the Makefile which might sometimes be inappropriate to do. | ||
| − | This can be fixed by creating a shortcut from the actual location of the uGFX repository to ''C:\ChibiStudio''. However, sadly the shortcuts that you can create in the Windows file explorer are not becoming part of the file system and are therefore not visible to make. This issue can be fixed by creating a real hardlink in the file system. The process to do so has been described [http:// | + | This can be fixed by creating a shortcut from the actual location of the uGFX repository to ''C:\ChibiStudio''. However, sadly the shortcuts that you can create in the Windows file explorer are not becoming part of the file system and are therefore not visible to make. This issue can be fixed by creating a real hardlink in the file system. The process to do so has been described [http://embedded.pro/symlinks-hard-shortcuts-under-windows/ here]. |
| + | |||
| + | [[Category:Guide]] | ||
Latest revision as of 21:54, 7 November 2016
This documentation will cover everything from downloading and installing ChibiStudio to getting your project run on actual hardware. In this tutorial we'll use a MikroMedia STM32-M4 board but this guide can be used for just any platform as there will only be slight variations.
Please note that ChibiStudio is part of the ChibiOS/RT project and is in no way owned by the uGFX project.
Installation
ChibiStudio is currently only available for Windows. There are however some ways to get ChibiStudio working on both Linux and Mac OS X. Please refer to the ChibiOS/RT documentation to learn how to do so. This guide will only cover using ChibiOS/RT on Windows.
The following prerequisites need to be downloaded and installed before ChibiStudio can be used:
- Java runtime
- Programmer / Debugger drivers (ST-Link in case of STM32)
- ChibiStudio
- uGFX
The following part of the documentation will cover downloading and installing each of those components.
Java
ChibiStudio is an Eclipse based IDE and needs a Java runtime to run. Important: ChibiStudio is currently only available in a 32-Bit version and will require a 32-Bit Java runtime.
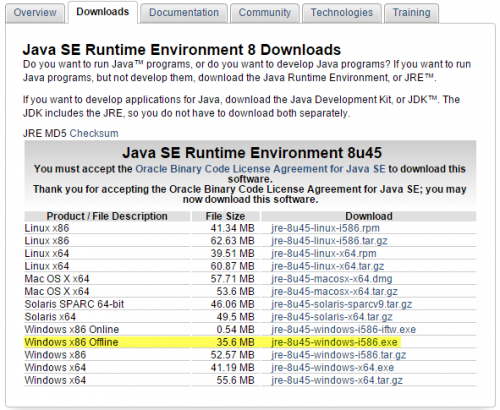
The Java runtime can be downloaded from the official Java website. It runs well with the Java 8 runtime. In case of you haven't already a 32-Bit Java runtime installed please download and install the Java 8 JRE for Windows. You want to download the Windows x86 Offline version. Note that you have to accept the licensing terms on the top of that list before you can download the installation file.
ST-Link V2
You will need a driver to communicate with your programmer/debugger (the thing that hooks up to your computer via USB). In case of STM32 this is called the ST-Link. You will to download and install the ST-Link Utility to use your programmer/debugger. This can be downloaded from the official ST website: ST-Link Utility website.
After you have clicked the Part Number link you will be forwarded to a new site. There you can click the Download button to download the file.
Extract the archive and install the program like any regular Windows software.
At the end of the installation, a wizard will ask you to install the drivers. It is important to install the drivers as you won't be able to communicate with the device otherwise.
At this point it is a good idea (and might be even required) to reboot your computer. After reboot, connect your ST-LinkV2 to the computer using the USB cable. Windows will present a notification in the task bar when the installation of the new driver was successful.
ChibiStudio
The latest version of the ChibiStudio can be downloaded here: ChibiStudio.In this tutorial we used ChibiStudio Preview 11. However, you're encouraged to download the latest available version.
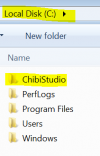
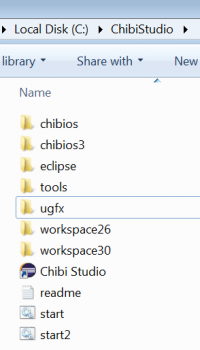
ChibiStudio comes in a 7z archive that can just be extracted and requires no installation at all. In case of you don't have appropriate software to extract a 7z archive you may install the official freeware 7-zip. Once extracted you need to move the directory to C:\ so that you get the resulting path C:\ChibiStudio. This is critical as this path is hardcoded into the ChibiStudio startup file and it won't be able to compile anything when it's in a different location.
uGFX
As described in this guide uGFX can either be downloaded as a stable release or as the git repository. Please note that it's strongly recommended to use the git repository in order to get the latest bug fixes, features and improvements.
Stable release
uGFX can be downloaded as a stable release ZIP archive from the official download website. After extracting the archive place the uGFX directory in C:\ChibiStudio so you'll end up with the path C:\ChibiStudio\ugfx.
Git repository
Using the git repository allows to always retrieve the latest bug fixes, features and performance improvements. The uGFX git repository is located at BitBucket.
Place the repository under C:\ChibiStudio so you'll end up with the path C:\ChibiStudio\ugfx.
Congratulations, you have finished installing everything needed to start developing your first project using ChibiOS/RT and uGFX!
Creating a project
First start of Chibistudio
ChibiStudio needs to be started by clicking the ChibiStudio shortcut under C:\ChibiStudio. Note that it is important to use this shortcut as it sets up some important environment settings.
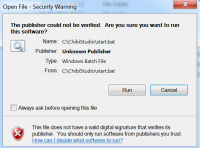
You can copy the shorcut to your desktop or add it to your start menu. When double clicking the shortcut to start the ChibiStudio you might be presented with a warning:
Uncheck Always ask before opening this file as we know that this program comes from a trustworthy source and click the Run button.
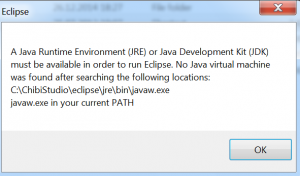
if you haven't installed a proper 32-Bit Java runtime you will be presented with the following error:
Please refer to the installation section to learn how to install Java to run ChibiStudio.
Create the first demo project
Getting the files right
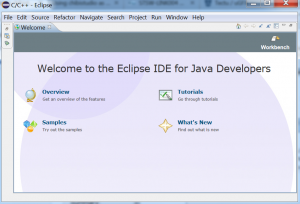
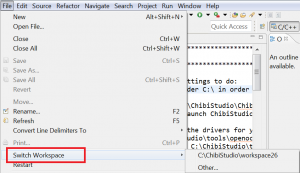
Close the welcome screen (pressing the 'x' in the tab). ChibiStudio is shipped with two workspaces: One for ChibiOS/RT 3.x and one for ChibiOS/RT 2.x. We'll use ChibiOS/RT 2.x in this tutorial because 3.x wasn't quite ready when this guide was written. To switch to the ChibiOS/RT 2.x workspace, use File -> Switch Workspace -> c:\chibistudio\workspace26.
The easiest way to start a new project is by copying an example demo project. You can copy any of the demos that you'll find in the project explorer. In this tutorial we'll copy the demo project STM32F4xx-GPT. A project needs to be opened before it can be copied. A double-click on the project will open it. Next, right-click on the folder icon of the project and select Copy. Then, right-click on the same icon and select Paste. A new window will appear giving you the ability to rename the project. Please note that the project name must not contain any spaces.
The next step is to add the required uGFX files to create a working project. The following files need to be placed into the projects directory:
- Display board file
- Touchscreen board file (if touchscreen is being used)
- Configuration file (gfxconf.h)
In this tutorial we're using the Mikromedia STM32-M4 board. This board is already supported by uGFX and therefore all the required files are linked internally. The only thing required to copy are the configuration files ChibiOS/RT. For this, copy all file from C:\ChibiStudio\ugfx\boards\base\Mikromedia-STM32-M4-ILI9341\example_chibios_2.x to your project directory. Replace any existing files.
First we will try to run one of the built-in demos of uGFX. To do this you will need to delete the main.c as the built-in demo link a main.c file internally.
The following files and folder should be located inside of the project directory:
- .build
- .cproject
- .project
- chconf.h
- halconf.h
- Makefile
- mcuconf.h
- openocd.cfg
Modifying the Makefile
Next, we need to modify the Makefile slightly. We have to specify the path to both ChibiOS/RT and uGFX. We modify the both variables accordingly:
GFXLIB		= ../../ugfx
CHIBIOS		= ../../chibios
We're already done. We can now build any of the available uGFX demos (those which can be found under /ugfx/demos/) by specifying the demo path in the Makefile (settings the GFXDEMO variable): That the end. You can try to compile a demo. This will compile the gdisp basics demo as the line says :
GFXDEMO = modules/gdisp/basics
Note that certain demos (such as tetris) require to link the math library. Linking the math library is archived by adding -lm to the LDFLAGS variable:
GFXDEMO		= applications/tetris
LDFLAGS         = -lm
Adding the uGFX source directory
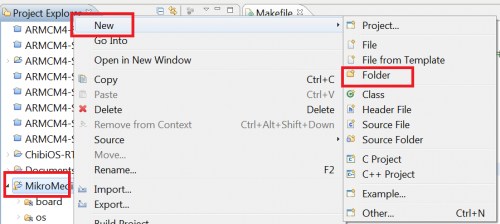
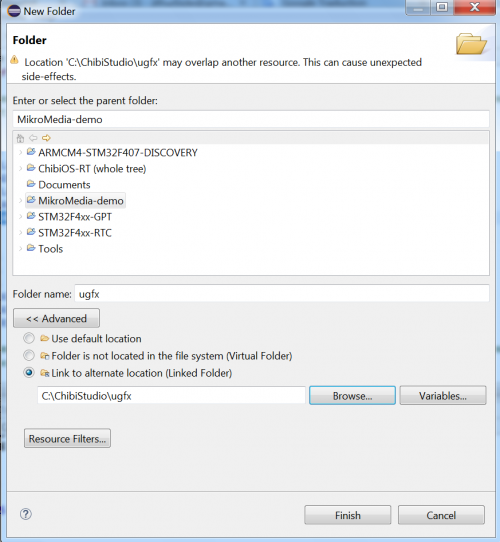
The next step is to add the uGFX folder to the project. To do this, right-click on the project folder, select New -> Folder.
In the dialog, click the Advanced >> button, select Link to alternate location (Linked Folder) and select the uGFX directory. Then click Finish.
Compiling
Compiling a project is done by clicking the hammer icon in the toolbar.
In case of you're getting any errors (the Problems tab in the bottom panel) you most likely haven't saved your files. If you hit any other problem please create a new thread in the uGFX community forum. Please provide sufficient information and we will be happy to help you where we can.
Note that trying a different demo by changing the GFXDEMO variable in the Makefile requires cleaning the project first by clicking Project -> Clean.
Final configuration of your project
Before you can download your compiled project to the board you need to do two more things:
- Change the board files (Only required for boards not supported by ChibiOS/RT)
- Configuring OpenOCD
Changing the board files
ChibiOS/RT requires board files. These board files set up the I/O pins of your microcontroller and do various other stuff. We need to tell ChibiStudio which board files need to be used.
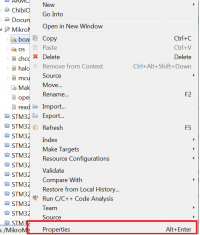
To specify which ChibiOS/RT board files should be used right-click on the board directory in the project file tree and click on Properties.
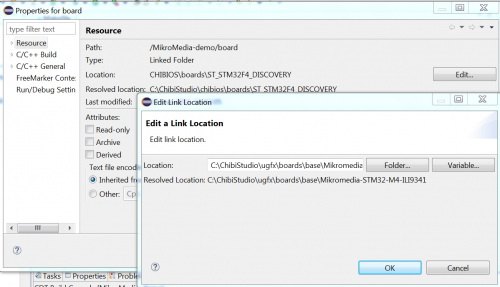
In the Resource tab click the Edit.. button next to the Location label.
Select the path which contains the ChibiOS/RT board files. In this tutorial we're using the Mikromedia STM32-M4 board. This board is not supported by ChibiOS/RT. However, uGFX provides the required ChibiOS/RT board files. In our case the path is: C:\ChibiStudio\ugfx\boards\base\Mikromedia-STM32-M4-ILI9341
Configuring OpenOCD
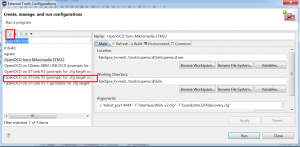
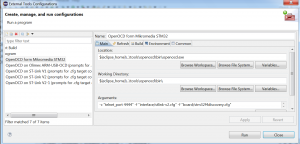
Next we will create a configuration for OpenOCD. OpenOCD is the piece of software that talks to your programmer (ST-Link in your case). To configure OpenOCD, click External Tools configuration....
Copy the OpenOCD on ST-Link V2-1 (prompts for .cfg target configuration) configuration.
Change the name to something appropriate for your setup. In our case: OpenOCD for Mikromedia STM32. Modify the argument option like: -c "telnet_port 4444" -f "interface/stlink-v2.cfg" -f "board/stm32f4discovery.cfg". If you're using a different hardware setup please modify the interface and board parameters accordingly.
Click Apply and Close.
Configuring debugger
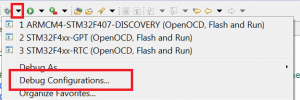
The last thing left to do is configuring the debugger (GDB). To do this, click Debug configurations...
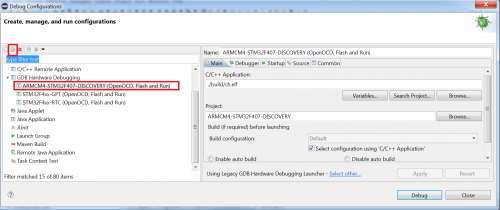
Copy an existing debug profile that is appropriate for your platform. We pick the ARMCM4-STM32F407-DISCOVERY in our case.
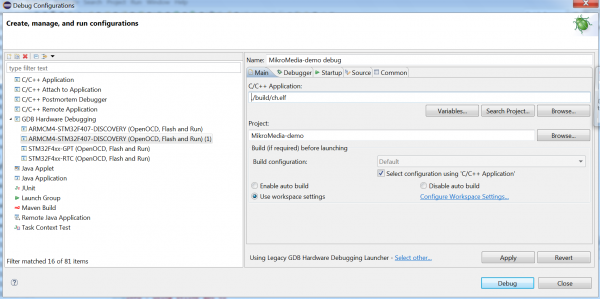
Rename the project to MikroMedia-demo debug and change the project to MikroMedia-demo.
Click Apply and Close.
Run the project
Now it's time to actually compile and flash the project to the board. The follow steps are performed to run the code on the target:
- Compile
- Start OpenOCD
- Start Debugger
- Run
Compile
Make sure that your project compiled without any errors.
Start OpenOCD
Start OpenOCD by clicking the little arrow next to the green icon with the red chest, pick the profile which you created earlier. If you're successful, you should be presented with various information of your target in the output panel at the bottom:
Start Debugger
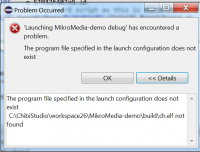
When you start the debugger the first time you will be presented with an error window telling you that ChibiStudio can't find the *.elf file.
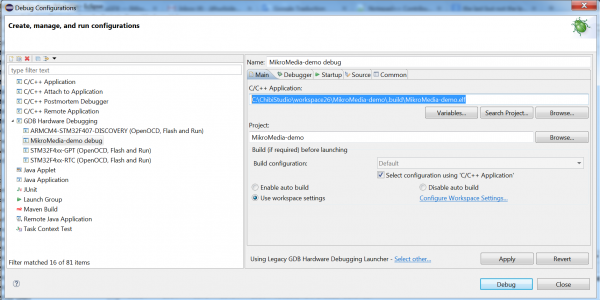
Open the Debug configurations.. window again. Edit the profile which you created earlier (MikroMedia-demo debug in our case) and modify the C/C++ Application path so it points to the *.elf generated in your project directory .build location: C:\ChibiStudio\workspace26\MikroMedia-demo\.build\MikroMedia-demo.elf:
Click Apply and Debug.
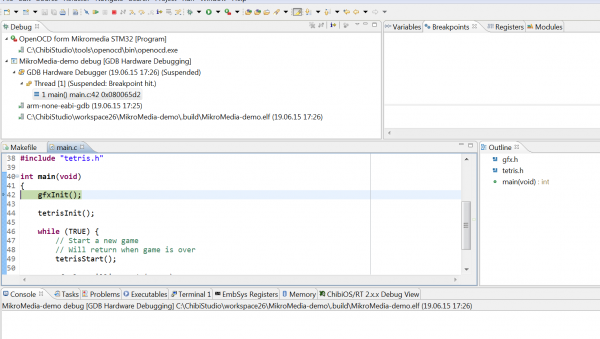
If everything went smoothly the debugger should launch correctly and ChibiStudio should switch to the Debug perspective.
Run
When the binary could successfully be flashed to the microcontroller, GDB stops the program at the beginning of the main() function. To run your program, click the Resume button:
Advanced tipps & tricks
The following section contains a few tipps and tricks to further simplify working with uGFX and the ChibiStudio in general.
Automatically save files before building
With the default settings of ChibiStudio is is required so manually save files after modification. However, eclipse provides the option to automatically save all modified files when building the project. This feature can be enabled under Window -> Preferences -> General -> Workspace -> Save automatically before build.
Using the uGFX repository with symlinks
In case of you're using the uGFX git repository instead of the stable release archive you might want to place the repository in a different location other than C:\ChibiStudio\ugfx. However, you'd have to modify the path pointing to the uGFX root directory in the Makefile which might sometimes be inappropriate to do. This can be fixed by creating a shortcut from the actual location of the uGFX repository to C:\ChibiStudio. However, sadly the shortcuts that you can create in the Windows file explorer are not becoming part of the file system and are therefore not visible to make. This issue can be fixed by creating a real hardlink in the file system. The process to do so has been described here.
