Difference between revisions of "Touchscreen Calibration"
(→Storing calibration data) |
(→Extreme coordinates) |
||
| (9 intermediate revisions by the same user not shown) | |||
| Line 4: | Line 4: | ||
See [[Touchscreen_Calibration#Retrieving calibration data|Retrieving calibration data]] to learn how to hard-code calibration data. | See [[Touchscreen_Calibration#Retrieving calibration data|Retrieving calibration data]] to learn how to hard-code calibration data. | ||
| + | |||
| + | Note that the system uses the coordinates it gets while the touchscreen is pressed. It therefore will increase the accuracy of the calibration process if the touchscreen is held down and then slowly released rather than using short presses. | ||
== Forcing calibration == | == Forcing calibration == | ||
| Line 16: | Line 18: | ||
== Extreme coordinates == | == Extreme coordinates == | ||
| − | By default the cross-hairs of the calibration dialog will | + | By default the cross-hairs of the calibration dialog will be displayed with a margin of approximately 25% from the display border. However, for some touchscreen types it is better to place the calibration cross-hairs directly at the corners of the display. The underlying GINPUT module provides a flag named <code>GMOUSE_VFLG_CAL_EXTREMES</code> that the touch driver can set in the driver configuration to enable this feature. As that is very inconvenient and requires modifying the driver itself, a well written driver would expose a simple configuration macro to the board file: |
| − | < | + | <source lang=c> |
| − | #define | + | #define GMOUSE_ADS7843_CALIBRATION_EXTREME_VALUES TRUE |
| − | </ | + | </source> |
== Storing calibration data == | == Storing calibration data == | ||
| Line 54: | Line 56: | ||
-0.06678, // ax | -0.06678, // ax | ||
-0.00187, // bx | -0.00187, // bx | ||
| − | 259.06353, // | + | 259.06353, // cx |
0.00039, // ay | 0.00039, // ay | ||
0.09974, // by | 0.09974, // by | ||
| Line 64: | Line 66: | ||
(void)instance; | (void)instance; | ||
| − | if (sz != sizeof(calibrationData)) { | + | if (sz != sizeof(calibrationData) || instance != 0) { |
return FALSE; | return FALSE; | ||
} | } | ||
| Line 76: | Line 78: | ||
== uGFX-Studio == | == uGFX-Studio == | ||
| − | [[File:Studio_calibration_values_dialog.png|250px|right|thumb| | + | [[File:Studio_calibration_values_dialog.png|250px|right|thumb|Settings dialog to specify calibration values]] |
| − | The uGFX-Studio provides a dialog to specify the calibration data and generates the corresponding code automatically. | + | The uGFX-Studio provides a dialog to specify the calibration data and generates the corresponding code automatically. The calibration data can be entered under <code>Settings -> GINPUT -> Calibration Values</code>. |
Latest revision as of 14:15, 24 May 2017
Certain user input devices such as touchscreens needs to be calibrated. For this, the GINPUT module provides a calibration dialog. The calibration uses a three-point algorithm. Three calibration points (cross hairs) will show up, one after another. Each of the crosses needs to be pressed as precisely as possible. At the end a fourth calibration cross will appear in the center of the screen. This last calibration point is used to test whether the calibration was successful. If the difference between the internal read-out of the touch coordinate and the expected result is too big the process will be restarted automatically. See Tolerance for more information.
By default the calibration dialog will pop-up on every power-up unless the GINPUT module could load valid calibration data. See Storing calibration data for more information.
See Retrieving calibration data to learn how to hard-code calibration data.
Note that the system uses the coordinates it gets while the touchscreen is pressed. It therefore will increase the accuracy of the calibration process if the touchscreen is held down and then slowly released rather than using short presses.
Contents
Forcing calibration
It is possible to show up the calibration dialog during runtime by calling ginputCalibrateMouse().
Tolerance
The calibration dialog will perform a check to verify that the calibration process was successful by presenting a fourth calibration point at the center of the screen. When the tolerance between the expected coordinates and the actual read-outs is too big the calibration dialog will restart itself. It's the responsibility of the touchscreen driver to specify how big the tolerance may be. Hence this value can be modified in the board file. Note that there are two tolerance settings: One for the pen mode and one for the finger mode. The values specified are pixels.
#define GMOUSE_ADS7843_PEN_CALIBRATE_ERROR		8
#define GMOUSE_ADS7843_FINGER_CALIBRATE_ERROR	       14
Extreme coordinates
By default the cross-hairs of the calibration dialog will be displayed with a margin of approximately 25% from the display border. However, for some touchscreen types it is better to place the calibration cross-hairs directly at the corners of the display. The underlying GINPUT module provides a flag named GMOUSE_VFLG_CAL_EXTREMES that the touch driver can set in the driver configuration to enable this feature. As that is very inconvenient and requires modifying the driver itself, a well written driver would expose a simple configuration macro to the board file:
#define GMOUSE_ADS7843_CALIBRATION_EXTREME_VALUES TRUEStoring calibration data
It is possible to save calibration data. This allows to calibrate a device once and load the corresponding calibration data on each startup to avoid calibrating the touchscreen on each power-up. The calibration storage interface is highly flexible and it's possible to store calibration data on any location that provides sufficient memory to save and load 24 bytes of data.
To enable the calibration data loading feature GINPUT_TOUCH_USER_CALIBRATION_LOAD must be set to TRUE in the configuration configuration file.
The following function is called by the GINPUT module on initialization (when gfxInit() is being called):
LoadMouseCalibration(unsigned instance, void* data, size_t sz)
You can implement this function in your own application code to provide the GINPUT module with existing calibration data.
Note that the calibration dialog will automatically pop-up when this function returns FALSE.
The same thing applies to storing calibration data during runtime: The GINPUT module will call the following function when the calibration dialog was passed successfully when GINPUT_TOUCH_USER_CALIBRATION_SAVE is set to TRUE in the configuration configuration file.
SaveMouseCalibration (unsigned instance, const void* data, size_t sz)
You can implement this function in your own application code to save the calibration data during runtime. This function must return TRUE if the calibration data could successfully be stored and FALSE otherwise.
Note: The instance parameters it the driver instance. This is only useful when more than one touchscreen is connected to the system. This parameter can be used to save the calibration data of each individual touchscreen.
Retrieving calibration data
It is possible to retrieve calibration data manually in order to hard-code them into a program. This is especially useful during the development phase.
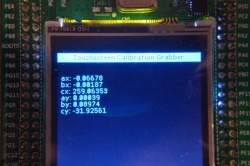
The calibration data is just a struct containing six float values. In order to hard-code them the struct must be populated with the appropriate values and then be passed to the GINPUT module through the calibration data interface. A special demo program has been written to retrieve the calibration data. The program can be found under /demos/tools/touch_calibration_grabber. The application will show the calibration dialog and display the required information to populate the calibration data structure afterwards.
The following code can be used to load hard-coded calibration data:
float calibrationData[] = {
	-0.06678,		// ax
	-0.00187,		// bx
	259.06353,		// cx
	0.00039,		// ay
	0.09974,		// by
	-31.92561 		// cy
};

bool_t LoadMouseCalibration(unsigned instance, void *data, size_t sz)
{
	(void)instance;

	if (sz != sizeof(calibrationData) || instance != 0) {
		return FALSE;
	}

	memcpy(data, (void*)&calibrationData, sz);

	return TRUE;
}
Note: You have to replace the values in the struct with the values which are displayed by running the /demos/tools/touch_calibration_grabber program!
uGFX-Studio
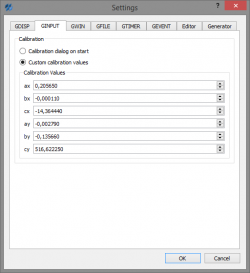
The uGFX-Studio provides a dialog to specify the calibration data and generates the corresponding code automatically. The calibration data can be entered under Settings -> GINPUT -> Calibration Values.

