Difference between revisions of "Raspberry Pi"
(→Prerequisites) |
(→Introduction) |
||
| (34 intermediate revisions by the same user not shown) | |||
| Line 1: | Line 1: | ||
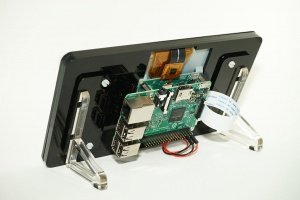
| + | [[File:raspberrypi stand backside.jpg|right|thumb|Raspberry Pi 3 Model B with 7" touchscreen and acrylic stand.]] | ||
µGFX applications can run natively (without emulation/simulation) on any Linux system. This means that µGFX can run without any problems on a Raspberry Pi. This is a step-by-step setup & configuration guide that will explain everything necessary to run µGFX on a Raspberry Pi. | µGFX applications can run natively (without emulation/simulation) on any Linux system. This means that µGFX can run without any problems on a Raspberry Pi. This is a step-by-step setup & configuration guide that will explain everything necessary to run µGFX on a Raspberry Pi. | ||
| Line 4: | Line 5: | ||
The most common question asked in this context is why to run µGFX on an embedded Linux device. Today's single board computers running Linux are powerful enough to run [https://en.wikipedia.org/wiki/X_Window_System X] and a complete desktop environment. Therefore, GUI applications can be written using desktop GUI frameworks such as Qt or GTK. Running µGFX instead on such as system has two main, but very important advantages: | The most common question asked in this context is why to run µGFX on an embedded Linux device. Today's single board computers running Linux are powerful enough to run [https://en.wikipedia.org/wiki/X_Window_System X] and a complete desktop environment. Therefore, GUI applications can be written using desktop GUI frameworks such as Qt or GTK. Running µGFX instead on such as system has two main, but very important advantages: | ||
* '''Dependencies:''' Installing [https://en.wikipedia.org/wiki/X_Window_System X], a desktop environment all required desktop applications and the required libraries to run custom built desktop applications pull many dependencies. This makes the system become heavy and bloated. However, the most important issue is that all these dependencies need to be maintainer. For example, when performing as sytem update, more components have to be tested to ensure the continuous and uninterrupted functioning of the device. This becomes even more important for mission critical equipmenet such as medical devices where each component needs to be audited and certified individually. Running µGFX on such a device '''vastly''' reduces the complexity of the system and therefore allows to built more stable & cheaper devices featuring a GUI while still running on a powerful Linux based system. | * '''Dependencies:''' Installing [https://en.wikipedia.org/wiki/X_Window_System X], a desktop environment all required desktop applications and the required libraries to run custom built desktop applications pull many dependencies. This makes the system become heavy and bloated. However, the most important issue is that all these dependencies need to be maintainer. For example, when performing as sytem update, more components have to be tested to ensure the continuous and uninterrupted functioning of the device. This becomes even more important for mission critical equipmenet such as medical devices where each component needs to be audited and certified individually. Running µGFX on such a device '''vastly''' reduces the complexity of the system and therefore allows to built more stable & cheaper devices featuring a GUI while still running on a powerful Linux based system. | ||
| − | * '''Resource requiremenets:''' | + | * '''Resource requiremenets:''' Running a µGFX application requires order of magnitudes less resources than running a full desktop environment with a Qt or GTK application. This is a huge benefit for systems that require every free byte of money and every CPU cycle available to fullfill non-GUI tasks (eg. taking measurements, handling communication, ...) |
| + | * '''Security:''' Having less software packages installed means less security vulnerabilities. A small, self contained µGFX application binary that doesn't require any other libraries or desktop environment services also means that the user of the product has less attacking vectors. | ||
== Used utilities == | == Used utilities == | ||
| Line 10: | Line 12: | ||
* [https://www.raspberrypi.org/products/raspberry-pi-3-model-b/ Raspberry Pi 3 Model B] | * [https://www.raspberrypi.org/products/raspberry-pi-3-model-b/ Raspberry Pi 3 Model B] | ||
* [https://www.raspberrypi.org/products/raspberry-pi-touch-display/ Raspberry Pi 7" Touchscreen Display] | * [https://www.raspberrypi.org/products/raspberry-pi-touch-display/ Raspberry Pi 7" Touchscreen Display] | ||
| − | * [https://www.raspberrypi.org/downloads/noobs/ | + | * [https://www.raspberrypi.org/downloads/noobs/ Raspbian (via NOOBS) operating system] |
However, this guide has been kept as generic as possible. Following the same steps should allow running µGFX on any embedded Linux system. | However, this guide has been kept as generic as possible. Following the same steps should allow running µGFX on any embedded Linux system. | ||
| Line 19: | Line 21: | ||
For more information about the Linux framebuffer, please see [[Linux#Framebuffer|Linux Framebuffer]]. | For more information about the Linux framebuffer, please see [[Linux#Framebuffer|Linux Framebuffer]]. | ||
| + | |||
| + | === Disabling X === | ||
| + | For simplicity, we are using the pre-configured Raspbian Linux distribution in this tutorial. That distribution comes with X and and entire desktop environment. It is configured in such a way that X always starts automatically. However, X blocks the access to the framebuffer. Therefore, we first have to manually disable X before we can continue. The easiest way of doing this is simply removing the X from auto-start. This is process is different for every Linux distribution. In case of Raspbian we can use the <code>raspi-config</code> tool to disable X: | ||
| + | <pre> | ||
| + | raspi-config ---> Boot Options ---> Console (Text console, requires user to login) | ||
| + | </pre> | ||
| + | |||
| + | However, if you'd like to keep your system as small as possible (in which case you probably don't want to start off with Raspbian in first place), you can just completely remove X from your system. See [https://raspberrypi.stackexchange.com/questions/4745/how-to-uninstall-x-server-and-desktop-manager-when-running-as-headless-server here] for instructions. | ||
| + | |||
| + | == Setting up the environment == | ||
| + | To keep this tutorial as simple as possible, we will compile the µGFX application directly on the target hardware (Raspberri Pi in this case). However, it is still possible to develop the actual µGFX application on a desktop computer for convenience, as the entire µGFX library is completely portable. Please refer to the corresponding guides to learn how to compile a µGFX application as a native application for [[Win32|Windows]], [[Linux|Linux]] or [[Mac_OS_X|OS X]]. | ||
| + | |||
| + | It is also possible to cross-compile the application for the target hardware on a desktop computer. However, that process will not be part of this guide. | ||
| + | |||
| + | === Compiler === | ||
| + | The easiest way to compile a µGFX application on the a Linux based embedded system is using GCC. The Raspbian distribution already comes with GCC pre-installed. Please refer to your distribution's documentation to learn how to install GCC. | ||
| + | |||
| + | === µGFX library === | ||
| + | A copy of the µGFX library can be obtained either as a ZIP file (stable release) or by cloning the official Git repository. Please refer to the [[Getting_Started#Downloading|Getting Started Guide]] for further instructions on how to downloading the µGFX library. | ||
| + | |||
| + | In this tutorial, we simply clone the git repository. Git is also part of the pre-installed packages of the Raspbian distribution: | ||
| + | <pre> | ||
| + | cd ~/Documents | ||
| + | mkdir -p projects/resources | ||
| + | cd projects | ||
| + | git clone https://git.ugfx.io/ugfx/ugfx resources/ugfx | ||
| + | </pre> | ||
| + | Note that you can setup your folder structure however you like. | ||
| + | |||
| + | == Creating a project == | ||
| + | After ensuring that the used Linux kernel comes with framebuffer support, installing GCC and downloading the µGFX library it's time to create a µGFX project. | ||
| + | <pre> | ||
| + | cd ~/Documents/projects | ||
| + | mkdir hello_world | ||
| + | </pre> | ||
| + | For the first test we are going to use the basic display test demo which can be found under <code>modules/gdisp/basics</code>. The easiest way to do this is using the high-level µGFX Makefile that allows setting the target architecture, board files and demo to compile. Save the following content in the current directory as a file named <code>Makefile</code>: | ||
| + | <source lang="make"> | ||
| + | # Possible Targets: all clean Debug cleanDebug Release cleanRelease | ||
| + | |||
| + | ############################################################################################## | ||
| + | # Settings | ||
| + | # | ||
| + | |||
| + | # General settings | ||
| + | # See $(GFXLIB)/tools/gmake_scripts/readme.txt for the list of variables | ||
| + | OPT_OS = linux | ||
| + | OPT_LINK_OPTIMIZE = yes | ||
| + | OPT_CPU = raspberrypi | ||
| + | |||
| + | # uGFX settings | ||
| + | # See $(GFXLIB)/tools/gmake_scripts/library_ugfx.mk for the list of variables | ||
| + | GFXLIB = ../resources/ugfx | ||
| + | GFXBOARD = Linux-Framebuffer | ||
| + | GFXDEMO = modules/gdisp/basics | ||
| + | |||
| + | # Linux settings | ||
| + | # See $(GFXLIB)/tools/gmake_scripts/os_linux.mk for the list of variables | ||
| + | |||
| + | ############################################################################################## | ||
| + | # Set these for your project | ||
| + | # | ||
| + | |||
| + | ARCH = | ||
| + | SRCFLAGS = -ggdb -O0 | ||
| + | CFLAGS = | ||
| + | CXXFLAGS = | ||
| + | ASFLAGS = | ||
| + | LDFLAGS = | ||
| + | |||
| + | SRC = | ||
| + | OBJS = | ||
| + | DEFS = | ||
| + | LIBS = | ||
| + | INCPATH = | ||
| + | LIBPATH = | ||
| + | |||
| + | ############################################################################################## | ||
| + | # These should be at the end | ||
| + | # | ||
| + | |||
| + | include $(GFXLIB)/tools/gmake_scripts/library_ugfx.mk | ||
| + | include $(GFXLIB)/tools/gmake_scripts/os_$(OPT_OS).mk | ||
| + | include $(GFXLIB)/tools/gmake_scripts/compiler_gcc.mk | ||
| + | # *** EOF *** | ||
| + | </source> | ||
| + | To compile, just execute <code>make</code>: | ||
| + | <pre> | ||
| + | make | ||
| + | </pre> | ||
| + | The program should compile & link without any errors: | ||
| + | <pre> | ||
| + | ... | ||
| + | Compiling ../resources/ugfx/drivers/gdisp/framebuffer/gdisp_lld_framebuffer.c | ||
| + | Compiling ../resources/ugfx/demos/modules/gdisp/basics/main.c | ||
| + | Linking .build/hello_world | ||
| + | </pre> | ||
| + | After successfull compilation, the program can be launched: | ||
| + | <pre> | ||
| + | .build/hello_world | ||
| + | </pre> | ||
| + | |||
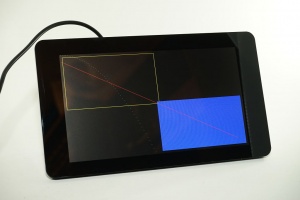
| + | [[File:rapberrypi_gdisp_basics_web.jpg|none|thumb|Result of the first compilation.]] | ||
| + | |||
| + | Next, we'll add the touchscreen to the mix. Firstly, we want to change the demo from the passive drawing demo to a demo that actually accepts touch input. For this purpose, we '''change''' the <code>GFXDEMO</code> variable in the <code>Makefile</code> to use the <code>applications/combo</code> demo: | ||
| + | <source lang="make"> | ||
| + | GFXDEMO = applications/combo | ||
| + | </source> | ||
| + | Attempting to compile would throw an error because we didn't select a mouse/touchscreen input driver: | ||
| + | <pre> | ||
| + | Linking .build/hello_world | ||
| + | /tmp/ccgwzzEo.ltrans3.ltrans.o: In function `_gmouseInit': | ||
| + | ccgwzzEo.ltrans3.o:(.text+0x192c): undefined reference to `GMOUSEVMT_OnlyOne' | ||
| + | collect2: error: ld returned 1 exit status | ||
| + | ../resources/ugfx/tools/gmake_scripts/compiler_gcc.mk:282: recipe for target '.build/hello_world' failed | ||
| + | make: *** [.build/hello_world] Error 1 | ||
| + | </pre> | ||
| + | If the touchscreen/mouse is available through the Linux event input system ''(eg. <code>/dev/input/event0</code>)'' we can use the pre-made board files <code>Linux-Framebuffer-Touch</code> by '''changing''' the <code>GFXBOARD</code> variable in the Makefile accordingly: | ||
| + | <source lang="make"> | ||
| + | GFXBOARD = Linux-Framebuffer-Touch | ||
| + | </source> | ||
| + | The program should now compile, linking & execute without any problem. Depending on the configuration, either the actual application shows up immediately or a calibration screen will be presented first. See [[Linux#Touchscreen_.2F_Mouse|here]] for more information. | ||
| + | |||
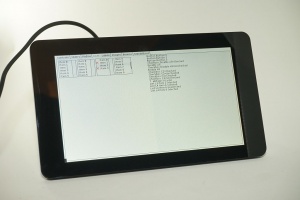
| + | [[File:raspberrypi_gwin_lists_web.jpg|none|thumb|Crude default demo of the widgets system.]] | ||
| + | |||
| + | There are plenty of other demos available that can be tested directly by modifying the <code>GFXDEMO</code> variable in the Makefile. All demos can be found in the <code>/demos</code> directory inside the µGFX library. The following image shows the minesweeper demo: | ||
| + | |||
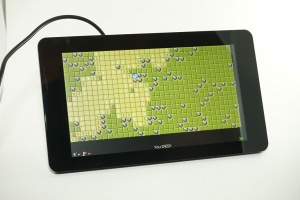
| + | [[File:raspberrypi_minesweeper_web.jpg|none|thumb|Mine sweeper game demo.]] | ||
== Troubleshooting == | == Troubleshooting == | ||
The most common issues are: | The most common issues are: | ||
| − | * The Linux kernel | + | * The used Linux kernel has not been compiled with framebuffer support. ''(See [[#Prerequisites|Prerequisites]]).'' |
* The framebuffer device is not accessible through one of the standard paths. ''(See [[Linux#Framebuffer|Linux Framebuffer]]).'' | * The framebuffer device is not accessible through one of the standard paths. ''(See [[Linux#Framebuffer|Linux Framebuffer]]).'' | ||
* The user executing the µGFX application doesn't have the permission required to access the framebuffer device. ''(See [[Linux#Framebuffer|Linux Framebuffer]]).'' | * The user executing the µGFX application doesn't have the permission required to access the framebuffer device. ''(See [[Linux#Framebuffer|Linux Framebuffer]]).'' | ||
| + | * Another application (usually the X Server) already uses, and therefore blocks, the framebuffer. ''(See [[#Prerequisites|Prerequisites]]).'' | ||
Latest revision as of 19:35, 26 August 2016
µGFX applications can run natively (without emulation/simulation) on any Linux system. This means that µGFX can run without any problems on a Raspberry Pi. This is a step-by-step setup & configuration guide that will explain everything necessary to run µGFX on a Raspberry Pi.
Contents
Introduction
The most common question asked in this context is why to run µGFX on an embedded Linux device. Today's single board computers running Linux are powerful enough to run X and a complete desktop environment. Therefore, GUI applications can be written using desktop GUI frameworks such as Qt or GTK. Running µGFX instead on such as system has two main, but very important advantages:
- Dependencies: Installing X, a desktop environment all required desktop applications and the required libraries to run custom built desktop applications pull many dependencies. This makes the system become heavy and bloated. However, the most important issue is that all these dependencies need to be maintainer. For example, when performing as sytem update, more components have to be tested to ensure the continuous and uninterrupted functioning of the device. This becomes even more important for mission critical equipmenet such as medical devices where each component needs to be audited and certified individually. Running µGFX on such a device vastly reduces the complexity of the system and therefore allows to built more stable & cheaper devices featuring a GUI while still running on a powerful Linux based system.
- Resource requiremenets: Running a µGFX application requires order of magnitudes less resources than running a full desktop environment with a Qt or GTK application. This is a huge benefit for systems that require every free byte of money and every CPU cycle available to fullfill non-GUI tasks (eg. taking measurements, handling communication, ...)
- Security: Having less software packages installed means less security vulnerabilities. A small, self contained µGFX application binary that doesn't require any other libraries or desktop environment services also means that the user of the product has less attacking vectors.
Used utilities
The following utilities will be used in this tutorial:
However, this guide has been kept as generic as possible. Following the same steps should allow running µGFX on any embedded Linux system.
Prerequisites
It is important that the used Linux kernel has been compiled with framebuffer support. With the latest version of Raspbian (state of 2016-08-23) this is the case. Therefore, we don't need to modify anything. If your Linux distribution doesn't come with a Linux kernel with enabled framebuffer support, please consult the corresponding documentation on how to enable it.
If your Linux kernel comes with built-in framebuffer support, you should see the framebuffer device under /dev/fb0, /dev/fb/0 or similar.
For more information about the Linux framebuffer, please see Linux Framebuffer.
Disabling X
For simplicity, we are using the pre-configured Raspbian Linux distribution in this tutorial. That distribution comes with X and and entire desktop environment. It is configured in such a way that X always starts automatically. However, X blocks the access to the framebuffer. Therefore, we first have to manually disable X before we can continue. The easiest way of doing this is simply removing the X from auto-start. This is process is different for every Linux distribution. In case of Raspbian we can use the raspi-config tool to disable X:
raspi-config ---> Boot Options ---> Console (Text console, requires user to login)
However, if you'd like to keep your system as small as possible (in which case you probably don't want to start off with Raspbian in first place), you can just completely remove X from your system. See here for instructions.
Setting up the environment
To keep this tutorial as simple as possible, we will compile the µGFX application directly on the target hardware (Raspberri Pi in this case). However, it is still possible to develop the actual µGFX application on a desktop computer for convenience, as the entire µGFX library is completely portable. Please refer to the corresponding guides to learn how to compile a µGFX application as a native application for Windows, Linux or OS X.
It is also possible to cross-compile the application for the target hardware on a desktop computer. However, that process will not be part of this guide.
Compiler
The easiest way to compile a µGFX application on the a Linux based embedded system is using GCC. The Raspbian distribution already comes with GCC pre-installed. Please refer to your distribution's documentation to learn how to install GCC.
µGFX library
A copy of the µGFX library can be obtained either as a ZIP file (stable release) or by cloning the official Git repository. Please refer to the Getting Started Guide for further instructions on how to downloading the µGFX library.
In this tutorial, we simply clone the git repository. Git is also part of the pre-installed packages of the Raspbian distribution:
cd ~/Documents
mkdir -p projects/resources
cd projects
git clone https://git.ugfx.io/ugfx/ugfx resources/ugfx
Note that you can setup your folder structure however you like.
Creating a project
After ensuring that the used Linux kernel comes with framebuffer support, installing GCC and downloading the µGFX library it's time to create a µGFX project.
cd ~/Documents/projects
mkdir hello_world
For the first test we are going to use the basic display test demo which can be found under modules/gdisp/basics. The easiest way to do this is using the high-level µGFX Makefile that allows setting the target architecture, board files and demo to compile. Save the following content in the current directory as a file named Makefile:
# Possible Targets:	all clean Debug cleanDebug Release cleanRelease

##############################################################################################
# Settings
#

# General settings
	# See $(GFXLIB)/tools/gmake_scripts/readme.txt for the list of variables
	OPT_OS					= linux
	OPT_LINK_OPTIMIZE			= yes
	OPT_CPU					= raspberrypi

# uGFX settings
	# See $(GFXLIB)/tools/gmake_scripts/library_ugfx.mk for the list of variables
	GFXLIB					= ../resources/ugfx
	GFXBOARD				= Linux-Framebuffer
	GFXDEMO					= modules/gdisp/basics

# Linux settings
	# See $(GFXLIB)/tools/gmake_scripts/os_linux.mk for the list of variables

##############################################################################################
# Set these for your project
#

ARCH     =
SRCFLAGS = -ggdb -O0
CFLAGS   =
CXXFLAGS =
ASFLAGS  =
LDFLAGS  =

SRC      =
OBJS     =
DEFS     =
LIBS     =
INCPATH  =
LIBPATH  =

##############################################################################################
# These should be at the end
#

include $(GFXLIB)/tools/gmake_scripts/library_ugfx.mk
include $(GFXLIB)/tools/gmake_scripts/os_$(OPT_OS).mk
include $(GFXLIB)/tools/gmake_scripts/compiler_gcc.mk
# *** EOF ***
To compile, just execute make:
make
The program should compile & link without any errors:
...
Compiling ../resources/ugfx/drivers/gdisp/framebuffer/gdisp_lld_framebuffer.c
Compiling ../resources/ugfx/demos/modules/gdisp/basics/main.c
Linking .build/hello_world
After successfull compilation, the program can be launched:
.build/hello_world
Next, we'll add the touchscreen to the mix. Firstly, we want to change the demo from the passive drawing demo to a demo that actually accepts touch input. For this purpose, we change the GFXDEMO variable in the Makefile to use the applications/combo demo:
GFXDEMO = applications/combo
Attempting to compile would throw an error because we didn't select a mouse/touchscreen input driver:
Linking .build/hello_world
/tmp/ccgwzzEo.ltrans3.ltrans.o: In function `_gmouseInit':
ccgwzzEo.ltrans3.o:(.text+0x192c): undefined reference to `GMOUSEVMT_OnlyOne'
collect2: error: ld returned 1 exit status
../resources/ugfx/tools/gmake_scripts/compiler_gcc.mk:282: recipe for target '.build/hello_world' failed
make: *** [.build/hello_world] Error 1
If the touchscreen/mouse is available through the Linux event input system (eg. /dev/input/event0) we can use the pre-made board files Linux-Framebuffer-Touch by changing the GFXBOARD variable in the Makefile accordingly:
GFXBOARD = Linux-Framebuffer-Touch
The program should now compile, linking & execute without any problem. Depending on the configuration, either the actual application shows up immediately or a calibration screen will be presented first. See here for more information.
There are plenty of other demos available that can be tested directly by modifying the GFXDEMO variable in the Makefile. All demos can be found in the /demos directory inside the µGFX library. The following image shows the minesweeper demo:
Troubleshooting
The most common issues are:
- The used Linux kernel has not been compiled with framebuffer support. (See Prerequisites).
- The framebuffer device is not accessible through one of the standard paths. (See Linux Framebuffer).
- The user executing the µGFX application doesn't have the permission required to access the framebuffer device. (See Linux Framebuffer).
- Another application (usually the X Server) already uses, and therefore blocks, the framebuffer. (See Prerequisites).


