Difference between revisions of "GINPUT"
(→Options) |
(→Touchscreen) |
||
| Line 1: | Line 1: | ||
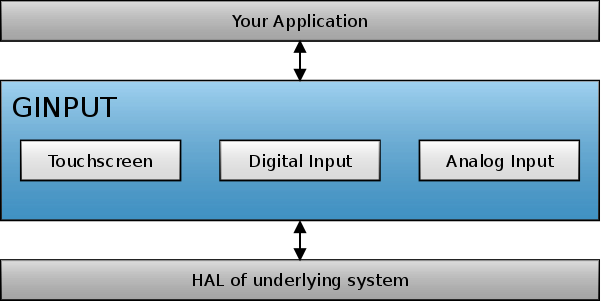
[[File:Ginput architecture.png|right|frame|GINPUT architecture]] | [[File:Ginput architecture.png|right|frame|GINPUT architecture]] | ||
GINPUT is a powerful module which provides an easy way to interface different hardware peripherals such as touchscreens to the rest of the library. It provides everything which these peripherals need in order to operate properly such as calibration routines for the touchscreens. | GINPUT is a powerful module which provides an easy way to interface different hardware peripherals such as touchscreens to the rest of the library. It provides everything which these peripherals need in order to operate properly such as calibration routines for the touchscreens. | ||
| + | |||
| + | == API reference == | ||
| + | The API reference of the GINPUT module can be found [http://ugfx.org/images/resources/doxygen/master/group___g_i_n_p_u_t.html here]. | ||
== Touchscreen == | == Touchscreen == | ||
Revision as of 01:16, 3 July 2014
GINPUT is a powerful module which provides an easy way to interface different hardware peripherals such as touchscreens to the rest of the library. It provides everything which these peripherals need in order to operate properly such as calibration routines for the touchscreens.
Contents
API reference
The API reference of the GINPUT module can be found here.
Touchscreen
A touchscreen can be interfaced very easily through the GINPUT module. It doesn't matter if it is a resistive, capacitive or any other touchscreen technology.
Board file
The board file API for the GINPUT touchscreen module looks like the following:
static void     init_board(void);
static bool_t   getpin_pressed(void);
static void     aquire_bus(void);
static void     release_bus(void);
static uint16_t read_value(uint16_t port);
Examples and a template file can be found under /drivers/ginput/touch/xxx/.
Attaching
The mouse has to be attached to GWIN using gwinAttachMouse(); where the parameter is the device instance. Therefore, it is possible to use more than just one pointing device in the same GWIN environment.
gwinAttachMouse(0);
Calibration
The GINPUT module provides a calibration routine which uses a three-point algorithm. Three calibration points will show up, one after another. You have to press each. At the end of this process, a 4rd one will appear in the center of the screen. This last one is only used to test if the calibration was successful. If the offset is too big, the calibration process will be restarted automatically.
Storage interface
An unpleasant problem you might run into with your touchscreen device is, that you have to perform a calibration at every reset. To fight this problem, GINPUT provides an interface to easily save and restore calibration data. The interface is very flexible and you can do with the calibration data what ever you want: You can store it on an SD card, in your MCU's internal flash, on an external I²C EEprom or every other possible way to store 25 bytes.
What you need to do is providing two functions, one to save and one to restore the calibration data:
void mysave(uint16_t instance, const uint8_t *calbuf, size_t sz);
const char *myload(uint16_t instance);
These two function are passed to ginputSetMouseCalibrationRoutines():
ginputSetMouseCalibrationRoutines(0, mysave, myload, FALSE);
The first parameter is the instance of the mouse device, the second one the save, the third the restore function. The last parameter defines if the buffer allocated by this function to pass the calibration data needs to be free()'d afterwards or not.
It's very important that this function gets called before you call the ginputAttachMouse() routine.
Example
Here's a simple example which shows how to save and restore the calibration data on an SD-Card using the GFILE module. Please note that this is just for demonstration. It's highly recommended to check the return value of every function.
static void mysave(uint16_t instance, const uint8_t *calbuf, size_t size)
{
	GFILE* f;
	uint8_t bsize;

	(void)instance;

	bsize = (uint8_t)size;

	f = gfileOpen("calib.gfx", "w");
	gfileWrite(f, (void*)&bsize, 1);
	gfileWrite(f, (void*)calbuf, bsize);
	gfileClose(f);
}

static const char *myload(uint16_t instance)
{
	GFILE* f;
	char* buf;
	uint8_t bsize;

	(void)instance;

	f = gfileOpen("calib.gfx", "r");

	gfileRead(f, (void*)&bsize, 1);
	buf = gfxAlloc(bsize);
	gfileRead(f, (void*)buf, bsize);

	gfileClose(f);

	return buf;
}
Overwriting existing data
If you want to overwrite the existing data on your memory without manually deleting the current one, simply pass NULL as a parameter of the load routine. The GINPUT module will then no longer be able to load calibration data and it will re-run the calibration process and overwrite the existing one. After successful calibration, the pointer to the loading function can be reset again.
Digital input
Also known as the Toggle driver. This driver can be used to interface common digital inputs (GPIOs). Mostly this driver is used to attach hardware buttons to a GWIN widget.
ToDo
Analog input
Also known as the Dial driver. This driver can be used to interface slow analog inputs. Mostly this driver is used to attach an analog peripheral such as a potentiometer or a sensor to a GWIN widget. It can also be used on digital inputs that emulate a graduated ratio output such as a digital "click" wheel (rotary encoder).
ToDo
